And Now For Something Completely Different
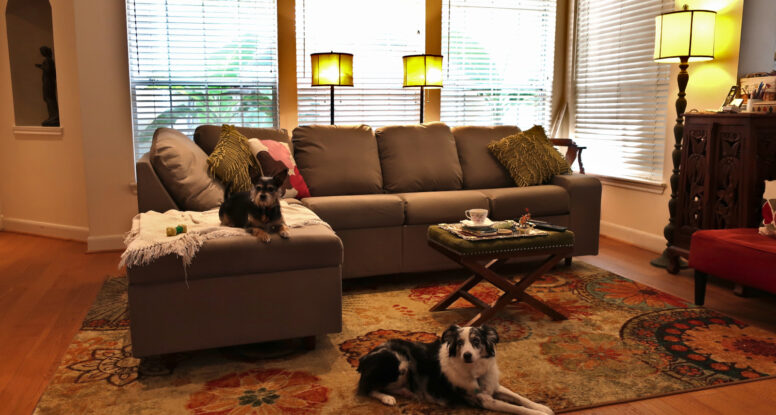
So I built a couch this week–one of those Home Reserve sectionals where all the parts are made on a CNC router and you have to put them together jig-saw style. I’ve never been a fan of “flat-pack” furniture, but with advancing technology, it’s lost most of the deserved stigma it once had. Indeed, if you buy a $1,000 or $3,000 couch, flip it over and pull off the bottom cover, you might be surprised how much is familiar from the IKEA flat pack experience.
So, when our couch upholstery wore out for the second time in 15 years, I was willing to consider options. I went to the store where we bought our first couch in Houston, but they sell refrigerators and their furniture selection is spotty at best. I went to the store where we bought the second, and they had lots and lots of options, but none would quite work for one reason or another–plus they cost three times as much. Most other furniture stores cost more-much more–and while my aunt’s ranch-oak living room set did survive three growing boys–it looked it by the end, so…
Finally, I started looking online and narrowing options. For our house and lives, I knew we needed:
- A small sectional, with slightly shallower seats than the old one.
- Durable, dog proof upholstery with a tight weave that can’t catch on tiny claws.
- Legs. We have a rescue terrier who is a super good little guy and has adapted to all the rules of living in the house except one–to him, any fabric of any kind hanging down to near the floor is in need of a little watering. Upholstered furniture sitting directly on the floor is unlikely to pass the Mr. Lucky test.
- Either no bottom cover (cambric) or at any rate, no hidden spaces that Mr. Lucky might use to hide food–because he’s been known to do that.
I looked and looked and kept coming back around to Home Reserve. The company offers a number of designs and every sectional configuration you could ever want. They are affordable and have excellent reviews. They offer a wide range of fabrics, including pet-friendly fabrics. But no legs. Their furniture is all made of OSB panels, and the feet are black plastic glides, pressed over little protrusions from the bottoms of the OSB panels and hidden from view by the item’s proximity to the floor.
So I contacted the company. They recommended a nice pet-friendly fabric and commiserated about the legs, saying they were working on one day having a leg kit, but hadn’t figured out how to do it.
All the assembly instructions are available for download, and these include lots of drawings of the panels, so I went looking for my own solution. Whatever it was, it had to preserve the engineering of the furniture as delivered. Forces had to be transmitted up the frame as they were meant to be, in roughly the same locations. The modification could not interfere with the fabric installation–and so could not change the edge profile of the OSB panels anywhere there would be fabric. I could fix adjacent units together but not in any way that can’t be undone later. The solution should work with–but never fight against–the forces holding the unit together while in use. The solution should add no more height than absolutely necessary (finished units are already 18″ high, and couches are typically between 18 and 22 inches from floor to seat). Oh…and I shouldn’t need any furniture-grade woodworking tools or skills, just simple carpentry.
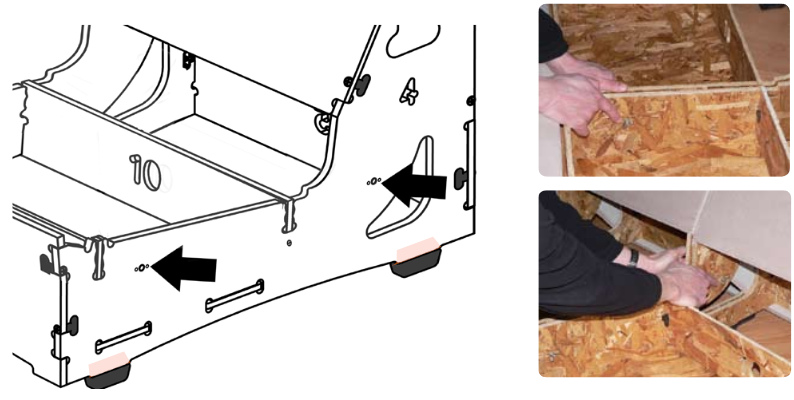
Okay. So, simply building a platform was out (too high), but looking through the drawings (which are not measured, so I could only estimate dimensions) I could see that most of the pieces have bottoms (in the image shown here, the bottoms are revealed by the tabs by which they insert into slots in the #4 side panel). So I had the space between those bottoms and the feet to work with. Further, while I cannot place any weight loading on the bottoms (that’s not how they are meant to be used and could cause a failure).

So, the solution was obvious. Simply cut off the existing feet and cut a recess (colored pink on diagram) exactly deep enough to accommodate a rail of ordinary 1x pine (which is actually about 3/4″ thick) as a base. Attach couch legs to this base rail.
Force will go up the legs into the rail, then into the side panels just as if they were sitting on their original feet. To hold the rails in place, cleats can be glued to the side panels to take screws, since you can’t screw into the edge of an OSB panel. In those locations (like the back of #4 in the drawing) in which a weight saving void was added at the factory, a larger cleat is glued in to distribute load around the void just like a header over a window or door in a house.
With this plan in hand, I took the risk and ordered my sectional units, along with a couple of sets of couch legs of standard design (which I got, of all places, from NewEgg). I say standard–couch legs come in two varieties. The first screw onto a central threaded spike, and that kind is of no use here. In the second, you attach a steel plate to the leg with screws, then screw the plate to your couch. Perfect.


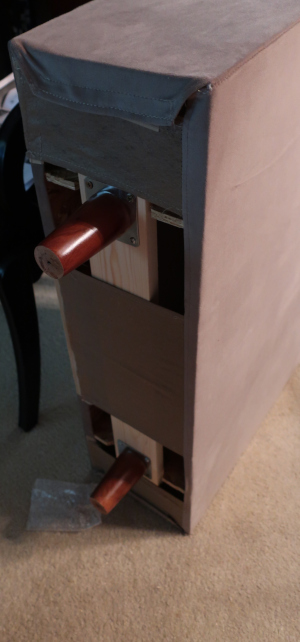
To the left you can see the finished solution. This is a finished Jovie arm unit standing on its back. Two 4″ hardwood legs have been attached to a central rail made of ordinary hardware store 1x stock. On the arm unit, the original feet ran the whole width of that little cross panel, so that was cut flush with the side panels using a circular saw, then the recess for the rail was cut with a router–much like at the factory.
The central base rail is cut long so that the leg is almost centered over the inner OSB panel that was the original foot. I could have exactly centered it, but offsetting it a bit let me use longer screws into the supporting cleat on one side.
To the right is shown one of the ottomans during assembly. Recesses have been routed straight through, then reinforced with 1.25″ cleats glued to the OSB. The cleats could have been slightly higher as long as they didn’t stick up above the OSB side panels where they’d have gotten in the way of the ottoman bottom panel added later. This assembly is upright (legs have not yet been installed) and will later rest in this position atop the new legs.
The ottomans were the easiest to modify as the original feet were all in a line. The arm units are not completely symmetrical in that the factory foot positions were slightly offset left to right (clearly to reduce waste when cutting the panels). I split the difference and cut my recesses so my rails would run right down the middle point of where the factory feet overlapped–thus ensuring that balance and load will remain unaffected.
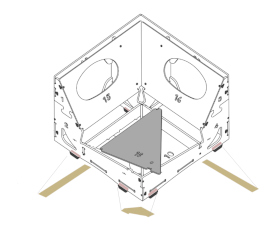
The only real difficulty I ran into in the whole project was on the corner unit. Here, none of the feet were lined up, and there were a total of six feet as cut by the factory. I routed these feet away into recesses as usual, but made them wide enough to allow two angled rails to span the pairs of feet on the outside back sides of the unit, then a corner piece to span the last (on the inside corner) and combine them into one. I could probably have just used straight rails and moved the support locations a bit, but again, some engineer somewhere designed it that way and I wanted to minimize my impact.
I did the corner unit first, knowing it would be the most complicated and that if worst came to worst, I could always buy another, but it worked out beautifully. I used a router, a Black and Decker Workmate bench, and a piece of scrap pine clamped in place as a fence to regulate the depth of the recesses. After a few careful test cuts, I set a combination square as a depth gauge for setting the fence for all further cuts. Where the factory feet extended beyond my new recesses, I cut them off with a small circular saw.
After routing off the factory feet and cutting my recesses, I assembled the OSB panels as per factory instructions. Then moved all the units into a room with a wooden floor and set them atop 2xb scraps and their rail to test the fit and make sure I hadn’t botched any of the cuts or missed something. All the modules bolted together without the slightest trouble, and after putting weight on the frames and rocking, I found only one corner that might need a tiny shim (and that slight wobble vanished after final assembly, so I turned out not to need any shim).
This done, I glued and clamped all the cleats that would be used to attach the rails, and after the glue dried overnight, screwed the rails to the cleats and the new feet to the rails for the corner and ottoman units and installed their upholstery.
For the three armless units that made up the long axis of the couch, I didn’t want each unit to have its own four feet like they do as cut at the factory. That would look silly with the legs showing and would be heavy and needlessly expensive. Instead, I put their upholstery on first, then laid all these units on their backs and bolted them together (and to the already completed arm unit shown above left). I then screwed two long 1x base rails across the whole length of the assembly. The design was so true and my routing so good, I had no trouble aligning the bolts that join the finished units and ensuring the newly cut recesses of adjoining units were exactly aligned. That done, I attached the new feet as with the other units, but with each armless unit sharing two feet with its immediate neighbor. After this, I just had to tip the chairs up onto their feet, bolts on the corner and the corner ottoman, and add cushions and dogs. Assembled this way, the upholstery cannot be removed from an individual unit, but if I ever want to replace or wash the upholstry or do a repair, the rails (legs and all) can he removed just by unbolting the corner and arm units, tipping the unit over, and unscrewing the rails.
So what so you think? Have you performed a similar modification? Do you have questions? Let me know in the comments below.

I have a small Home Reserve sectional – 2 chairs on one side, a corner in the middle, and one more chair and a half on the other side. I would like it to be an inch higher off the ground so I can get one of those “C tables” to put next to it or my coffee cup. I’m looking at simply putting risers under the existing feet. Is there any reason you didn’t do that? And since you’ve done so much research on Home Reserve feet, do you think that would work for me? If so, how many risers do you think I need, since each piece has four little feet, but they are all bolted together? I’m thinking two on each end for sure, and maybe all four on the corner piece? Thanks for your help!
I see no reason that wouldn’t work as long as the lifts are an inch or less. The only trick is, the lifts need to be large enough to accommodate the longest foot–or the longest pair where two are adjacent as assembled, and you need to check to make sure it’s actually possible to get one under every foot or pair of feet–leaving no feet unsupported (as could happen say, if two feet are a few inches away in such a way that you just can’t fit two risers next to each other. And that won’t be a problem if you are making your own risers, which would be simple with fairly basic tools. And of course, there will be nothing to keep the couch on the feet–which should not be a problem as long as you don’t have rambunctious children or large dogs–although you will absolutely have to have a lip around the edge to keep a foot from slipping off when someone plops down–and damaging the couch.
I didn’t use risers because I needed at least 4″ of lift to discourage the rescue dog from peeing on the corners (which it has). I’m immensely happy with the way it’s turned out, and have had several occasions to reconfigure as a bed with similar success. Good luck!
Reading this in 2024. I’ve been having my Home Reserve sectional for about 8 years. This is a great idea! I have no wood working or power tool skills. If I did I would definitely add legs. Currently pining for a leather sectional. I’ve changed the fabric 3x and I am bored to tears with this great little sofa.
Do you have any pictures of how your unit looks? I’m interested to see your placementbof the feet. I have several Home Reserve units – sectionals, loveseat, and ottomans. I would LOVE to add feet, mostly to be able to vacuum underneath and secondly for esthetic reasons. Although I have tools, my skills are not quite that good…I would pay$$ for an instructional video and set of plans, though! With a bit of additional guidance, I might be able to do this! Many thanks for your post.
There are images toward the bottom showing the placement of the feet and their support rails. Basically, each foot is supported by a stock 1 by pine board rail that carries weight from at least two points on the frame to the foot. Two points of contact with the bottom edge of a frame side panel prevent any twisting force on the feet or chipboard. Everywhere the rail meets the frame, a scrap is glued to the side of the chipboard and then to the rail to provide a stronger bond and strengthen the intersection of the two to prevent twisting at the joint. Polyurethane glue used for permanent waterproof bond. In the simplest cases, rail simply spans the module and I used a router to cut slots so it sets flush. In other cases, I also cut the ends of the rail at an angle to meet a corner. You could probably skip routing out the slots and just glue rails to the bottom of the frame, mitering and painting the exposed edge to hide it. It really wasn’t that hard, just tedious. The hard part was planning out where all the rails would go ahead of time. I made all the cuts before assembling the couch, though in retrospect, that actually might have made things harder. Five years later, we still have the couch and still love it.