My DIY Generator
I never know whether to blog about my DIY projects, but this one got a big reaction when I mentioned it online, so here goes.
As I mentioned in an earlier post covering the wiring, we have a lot of power outages in Texas which, between ice, heat, hurricanes, and the buried utilities in my neighborhood, are inconveniently long and frequent. So….more and more folks ’round these parts are getting backup generators, but I don’t want to pay the cost of a new car for a whole-house natural gas backup system I don’t really need, hope never to use, and will need a maintenance contract to keep ready in case I do. I really only need enough juice to keep one room habitable, the food cold, and the wifi running. A simple portable generator can do that, and for a WHOLE lot less money, I just need it set up and standing by when I need it–no dragging it out to the yard, erecting a rain shield, and trying to feed heavy gauge power cords in through the windows.
Whole house generators are usually connected to a home’s mains wiring through an automatic cutoff switch. I didn’t do that because it’s expensive, requires a licensed professional, and is not very practical for a generator barely powerful enough to power one of the twenty circuits in the house. Instead, I wired up a completely separate emergency power system with outlets behind the frig, in the living room, in the office, and in the bedroom where the wifi lives. It’s much easier for the family to understand that the generator can run one portable AC or heater, the frig, and a few lights and computers, when plugged into the emergency outlets.
I documented the electrical work here. This post is about the generator.
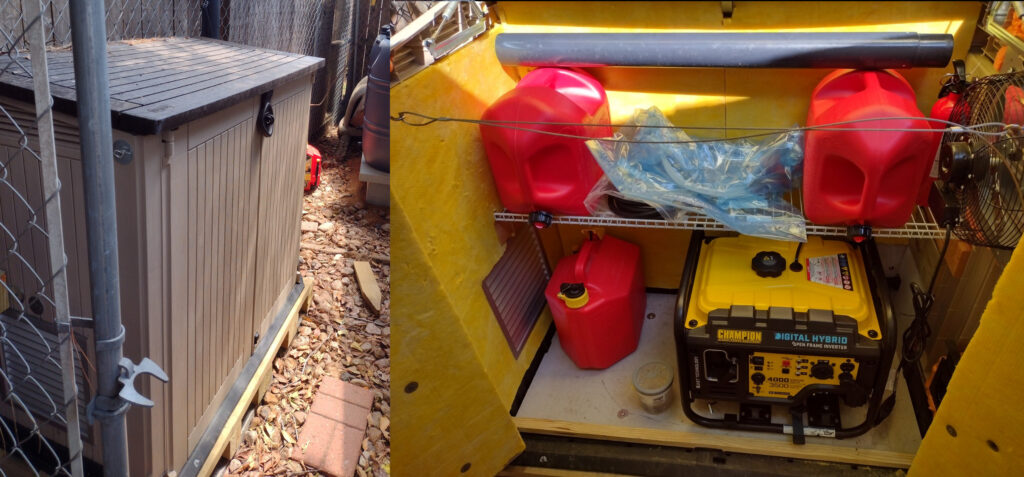
Left, finished generator housing with exhaust stack and water storage in background. Right, generator enclosure open, in storage configuration. Insulation panels still need to be glued in the right of generator.
- I bought a small open-cage inverter generator capable of providing clean enough power to spare the electronics–which these days is everything including the frig.
- I bought a good quality plastic garbage can enclosure and modified it to enclose the generator, both to protect it from the elements and control noise during operation.
- A simple foundation of concrete blocks and pressure-treated wood keeps it stable and dry, but can be relocated if need be. This is all inside the old dog run, which has the added benefit of extra security.
- Concrete pavers and a bed of river rock protect from shock in the event of a ground fault during a rain event when the ground is saturated. But mostly, weeds suck.
- Concrete board (Hardi panel, what you might use behind tile in a shower) provides a solid, weather-resistant, heat-resistant base and is attached to the foundation with lag screws down through the plastic enclosure into the foundation.
- The generator itself is secured by woodworking clamps and bolts extending up through the bottom of the enclosure. The bolts are epoxied and the clamps can be removed for service.
- Cement board also protects the corner where the hot exhaust exits. Rigid fiberglass insulation panels glued inside the enclosure with adhesive gutter sealant absorb noise and insulate the plastic to some extent from heat.
- An attic fan with automatic louvers is plugged into the 120V outlet on the generator to automatically draw air in through an equal-size weatherproof vent to the left and over the generator when running.
- A three-inch blast gate (black plastic on wall to right of generator) can be opened to feed in the RV-style plug to connect the generator to the house during use, and closed to keep out vermin and moisture the rest of the time.
- An ordinary wire shelf provided storage for (empty) gas cans, fire extinguisher, the RV hookup cable, exhaust stack components, and a siphon (big blue zip-lock bag) for draining the gas tank before storage.
- A cable and turnbuckles stabilize the enclosure and keep the outer walls from sagging open when the top is up and the doors are open.
- A can of Damp-Rid keeps humidity under control during storage.
- A battery-operated remote thermometer lets me monitor the temperature and humidity inside the enclosure during operation.
- Unfortunately, the exhaust for this generator exits the back, not the side which would have worked better, but I was able to leave an inch of open air all around and wrapped the exhaust piping with fiberglass exhaust tape, used to protect motorcyclists from burns.
- The exhaust was the hardest part.
- Parts from online let me adapt the exhaust outlet to standard threaded 3/4″ water pipe which exits to the left into a right-angle bend and up into the exhaust riser.
- I leached the zinc plating off the pipes, painted with high-temperature exhaust paint, and fitted together with exhaust sealant.
- That means that while the generator can be removed for servicing, part of the exhaust must be decoupled to do it. Not a bit deal, I just had to account for that in the design and a flexible exhaust hose would have been better.
- After exiting the enclosure, the exhaust pipe turns skyward and enters an exhaust stack made for RVs and bought secondhand on eBay. The stack is just there to keep exhaust gases from building up in the dog-run area during operation and works well.
- To keep out rain, the stack is capped with a bucket for storage and with a sheet metal roof vent cap when in use.
- The insulated pipe exits the enclosure through a cut down metal roof collar modified with an inner scoop of sheet aluminum to keep water out.
- The whole right-angle elbow up into the exhaust stack is collared with 1/4″ machine cloth to keep rats and wasps out.
To put it into service, I just:
- Open the enclosure top and doors.
- Remove all stored items and secure outside the enclosure, keeping fire extinguisher handy between enclosure and house.
- Remove cover from exhaust stack and install upper sections and cap.
- Open blast gate, connect RV connector to house, feed plug end through blast gate and plug into generator.
- Turn generator fuel valve (to left, rear) to “open” position if closed. Can anyone tell me if there’s actually any reason to even close it, since the generator will always be run dry for storage?
- Fill generator gas tank and turn off “economy mode” switch.
- Turn on ignition, pull choke, and pull cord to start.
- Close choke.
- Close doors and top.
- Go inside and plug refrigerator, wifi UPS, and office UPS into red “Emergency” outlets.
- If needed, connect up to one portable AC, one heater or electric appliance, and a few hundred watts of chargers, lights, fans to any emergency outlet.
To put it into storage (after everything’s been plugged back into mains power and danger of power loss is past):
- Disconnect power cable from house and generator and return to storage shelf.
- Siphon generator gas tank into gas can.
- Dispose of all stored gasoline by pouring into cars. (Do not return gas cans or siphon to enclosure until empty and thoroughly vented and dry).
- Return exhaust stack upper and fire extinguisher to storage.
- Close blast gate and restore cover to exhaust stack.
- freshen canister of Damp-Rid.
- Close enclosure doors and top.
Update 03/14/2024: I ran the generator for a little over an hour in 82 degree weather. It ran the refrigerator for all that time and ran a space heater for a short while. Enclosure temperature stabilized at 130 F.